How to convert MBR to GPT without losing data
Converting an MBR partition to a GPT partition may be necessary to take full advantage of the capabilities of a modern hard drive, especially if you exceed the 2TB capacity threshold. MBR (Master Boot Record) is an old partition scheme that dates back many years, while GPT (GUID Partition Table) is a newer and more advanced partition system, which offers a number of advantages over MBR.
However, converting from MBR to GPT is not always a simple operation and requires some precautions to avoid losing data on your hard drive. So in this article, we will see how to convert MBR disk to GPT disk without losing data.
Table of contents...
Why convert MBR partition to GPT
First of all, it’s important to understand the differences between MBR and GPT. MBR is a partition system that uses a 64-byte partition table located at the beginning of the hard drive. This partition table contains information about the partitions on the disk, including their size, file system type, and offset within the disk. MBR can handle up to four primary partitions, or three primary partitions and one extended partition, which can contain additional logical partitions.
GPT, on the other hand, uses a 128-byte partition table located at the end of the hard drive. This partition table contains the information about the partitions present on the disk, like in MBR, but it can handle more partitions and exceed the 2TB disk capacity threshold without any problem.
Before starting
In this guide, we will look at converting MBR to GPT for Windows operating systems. The conversion can be done using a single command. However, before proceeding with the conversion, it is important to perform a complete backup of the data on the hard drive, to avoid data loss in case of accidental errors.
Once your data is backed up, you can start the conversion using the “ mbr2gpt ” command from a command prompt, run with elevated privileges. Then, open the Windows command prompt, as administrator, and locate the ID of the disk to convert. The operation is simple. Just type and execute the “Diskpart.exe” command and then the “LIST DISK” instruction. Once the hard disk has been identified, note the belonging ID, from the list, as shown in the figure. If your computer has only one hard disk then its ID will always correspond to “ 0 ”:

Preparing to convert to GPT
Before starting it is necessary to execute the command “mbr2gpt /validate”. This Windows command is used to check if a disk can be converted from the MBR (Master Boot Record) partition scheme to the GUID Partition (GPT) partition scheme. Table ) without data loss.
Basically, the command performs a series of checks on the disk to ensure that it meets all the requirements for converting from MBR to GPT. If the disc does not meet the requirements for conversion, the command will return an error and conversion will not be possible.
mbr2gpt /validate command allows you to check in advance if the startup disk is compatible with the conversion. If the disc is not compatible, you will need to take additional steps to prepare the disc for conversion. Usually, and especially with very new computers, this type of conversion is almost always possible.
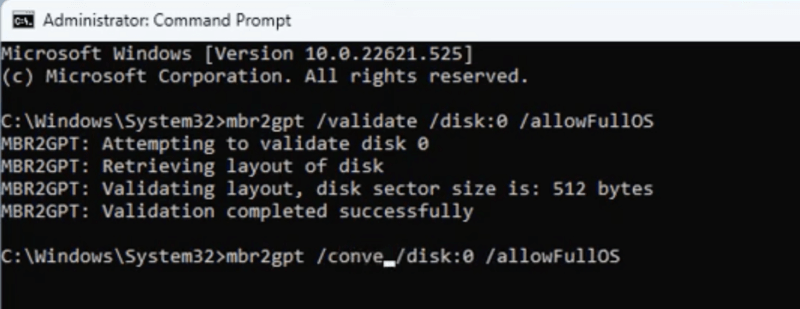
Now, check if your disk can be converted from MBR to GPT. Therefore type the command, mbr2gpt /validate /disk:xx /allowFullOS, in the Windows command prompt window, replacing the “xx” with your hard drive id that you noted earlier:

If the validation of the disk to be converted is completed successfully then you can continue with the next command.
Start converting MBR to GPT
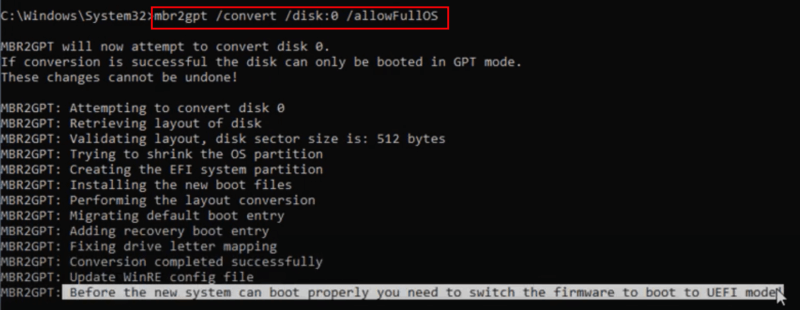
Okay here we go. Now you can start the conversion of your hard drive from MBR to GPT by typing the command “ mbr2gpt /convert /disk:xx /allowFullOS ” in the command prompt window and after that hit the ENTER key. Remember to always replace the “xx” symbols with the ID relating to your hard disk and, if your PC only has one, to specify the value “0” as the ID. Once the disk conversion phase is complete, the system will suggest that you set the boot device to UEFI from BIOS.

Then, restart the computer, access the BIOS, pressing the required key and set the boot of your system to ” UEFI and LEGACY model “. Basically, to avoid confusion, select the “UEFI” mode wherever it is selectable. Now save the changes and restart your PC. At this point, your computer’s hard drive will have been converted from MBR to GPT with countless advantages. Now you will find out in detail what are the advantages that this type of conversion has brought to your PC.
The advantages of partitioning the disk in GPT
There are several advantages to having a GPT partition (GUID Partition Table ) instead of a MBR (Master Boot Record) partition:
More storage capacity
the MBR partition scheme only supports 2TB of maximum storage capacity, while the GPT partition scheme supports up to 9.4 zettabytes, which means that GPT can handle large disks without the need to divide disks into smaller partitions.
Better reliability
GPT keeps multiple copies of partition table on a disk and uses checksum for each table to ensure disk integrity. This means that in the event of hard disk problems or data corruption, it is easier to restore disk information.
Multiple and variable sized partitions
GPT allows you to create a large number of primary partitions, while MBR allows only four primary partitions. Also, with GPT, you can create partitions of varying sizes, which helps you use disk space more efficiently.
UEFI support
GPT is required for modern operating systems that use the UEFI firmware interface (Unified Extensible Firmware Interface). This interface replaces the BIOS (Basic Input/Output System) and allows the operating system to boot in UEFI mode.
Data protection support
GPT allows you to use the data protection technology called ” EFI System Partition “, which allows you to boot the operating system in safe mode and protect critical operating system data from viruses and other threats.
In summary, GPT partition offers higher capacity, reliability, flexibility and security than MBR partition. Therefore, your computer will now undoubtedly be more efficient and performing than it was before.
Read more: The least used but very powerful javascript command


